| .. | ||
| benchmark | ||
| cli | ||
| data | ||
| docs | ||
| examples/todoApp | ||
| images | ||
| src | ||
| test | ||
| tools | ||
| .gitignore | ||
| .hlint.yaml | ||
| .stylish-haskell.yaml | ||
| ChangeLog.md | ||
| LICENSE | ||
| new-release | ||
| package.yaml | ||
| README.md | ||
| run | ||
| Setup.hs | ||
| stack-hlint.yaml | ||
| stack-ormolu.yaml | ||
| stack-snapshot.yaml | ||
| stack-stan.yaml | ||
| stack.yaml | ||
| testEnv.hs | ||
Waspc
This directory contains source code of the wasp compiler (aka waspc), and this README is aimed at the contributors to the project.
If you are a Wasp user and not a contributor (yet :)), you might want to look into following resources instead (Project page, Docs).
First time contributor checklist
If you would like to make your first contribution, here is a handy checklist we made for you:
- Read Quick overview.
- Compile the project successfully and get todoApp example running (follow Basics).
- Join Discord and say hi :)!
- Pick an issue labeled with "good first issue" and let us know you would like to work on it - ideally immediatelly propose a plan of action and ask questions. If you can't find a suitable issue for you, reach out to us on Discord and we can try to find smth for you together.
- Make a PR and have it accepted! Check Typical workflow for guidance, and consult Codebase overview for more details on how Wasp compiler works internally.
Quick overview
Wasp compiler is implemented in Haskell, but you will also see a lot of Javascript and other web technologies because Wasp compiler transpiles Wasp code into them.
You don't have to be expert in Haskell to contribute or understand the code, since we don't use complicated Haskell features much -> most of the code is relatively simple and straight-forward, and we are happy to help with the part that is not.
Main result of building the project is wasp executable (also reffered to as CLI), which is both Wasp compiler, CLI and Wasp project runner in one - one tool for everything Wasp-related.
wasp executable takes .wasp files and ext/ dir as input and generates a web app from them.
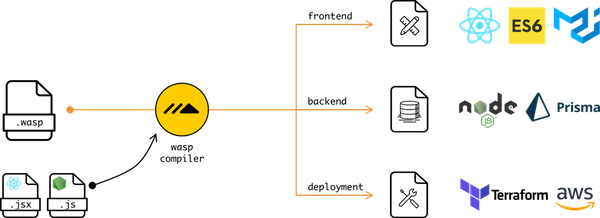
It can then also run that web app for you, deploy it (not yet but that is coming), and manage it in other ways.
Basics
Setup
We use Stack for building the project, so you will need to install stack on your machine.
Repo
Fork this repo and clone the fork to your machine (or clone this repo directly if you don't plan to contribute but just want to try it out).
Position yourself in this directory (waspc/) and make sure that you are on the main branch.
Build
stack build
to build the library and wasp executable.
This might take a longer time (10 mins) if you are doing it for the very first time, since stack will need to download the external dependencies.
NOTE: For macOS Big Sur users there is a bug in older GHC versions (<= 8.10.3) causing system frameworks to load improperly and will fail when building the project. This can be fixed with the following steps:
Show details
-
Clean up stack cache which could have been carried over from previous OS versions using below command.
rm -Rf ~/.stack/setup-exe-cache/x86_64-osx -
Run
stack builduntil it fails with errorcan't load framework: Cocoa (not found). -
Checkout and build this workaround.
-
Re-run stack build with workaround using below command and it should build without errors.
DYLD_INSERT_LIBRARIES=~/macos11-haskell-workaround/macos11ghcwa.dylib stack build
Test
stack test
to ensure all the unit tests are passing (this will also build the project if needed).
Executable
stack exec wasp-cli
to run the wasp-cli executable that you just built!
It should print "Usage" information.
You can pass more arguments by just adding them to the command, e.g.: stack exec wasp-cli new MyProject.
Run example app
Position yourself in waspc/examples/todoApp/ and run
stack exec wasp-cli db migrate-dev
to update database schema (this is done only on schema changes).
Then,
stack exec wasp-cli start
to run web app in development mode.
If you are doing this for the very first time, it might take a minutes or so to download and install npm dependencies.
When done, new tab in your browser should open and you will see a Todo App! NOTE: Reload page if blank.
Typical development workflow
- Create a new feature branch from
main. - Run
./run ghcidfrom the root of the project: this will run a process that watches the Haskell project and reports any Haskell compiler errors. Leave it running.
NOTE: You will need to installghcidglobally first, you can do it withstack install ghcid. - Do a change in the codebase (most often in
lib/orcli/ordata/) (together with tests if that makes sense: see "Tests"). Fix any errors shown byghcid. Rinse and repeat. - Once close to done, run
stack testto confirm that project is passing tests (new and old). - If needed, confirm that
examples/todoApp/is working correctly by runningstack buildfirst, to build the wasp executable, and then by running that executable withstack exec wasp-cli startfrom theexamples/todoApp/dir -> this will run the web app in development mode with the current version of your Wasp code. Manually inspect that app behaves ok: In the future we will add automatic integration tests, but for now testing is manual. - When all is ready, squash commits into one commit (or a few if that makes sense) and create a PR. Keep an eye on CI tests -> they should all be passing, if not, look into it.
- If your PR changes how users(Waspers) use Wasp, make sure to also create a PR that will update the documentation, which is in a separate repo.
- Work with reviewer(s) to get the PR approved. Keep adding "fix" commits until PR is approved, then again squash them all into one commit.
- Reviewer will merge the branch into
main. Yay!
Design docs (aka RFCs)
If the feature you are implementing is complex, be it regarding its design or technical implementation, we recommend creating a design doc (aka RFC). It is a great way to share the idea you have with others while also getting help and feedback.
To create one, make a PR that adds a markdown document under wasp/docs/design-docs, and in that markdown document explain the thinking behind and choice made when deciding how to implement a feature.
Others will comment on your design doc, and once it has gone through needed iterations and is approved, you can start with the implementation of the feature (in a separate PR).
Codebase overview
Wasp is implemented in Haskell.
Codebase is split into library (src/) and CLI (cli/).
CLI is actually wasp executable, and it uses the library, where most of the logic is.
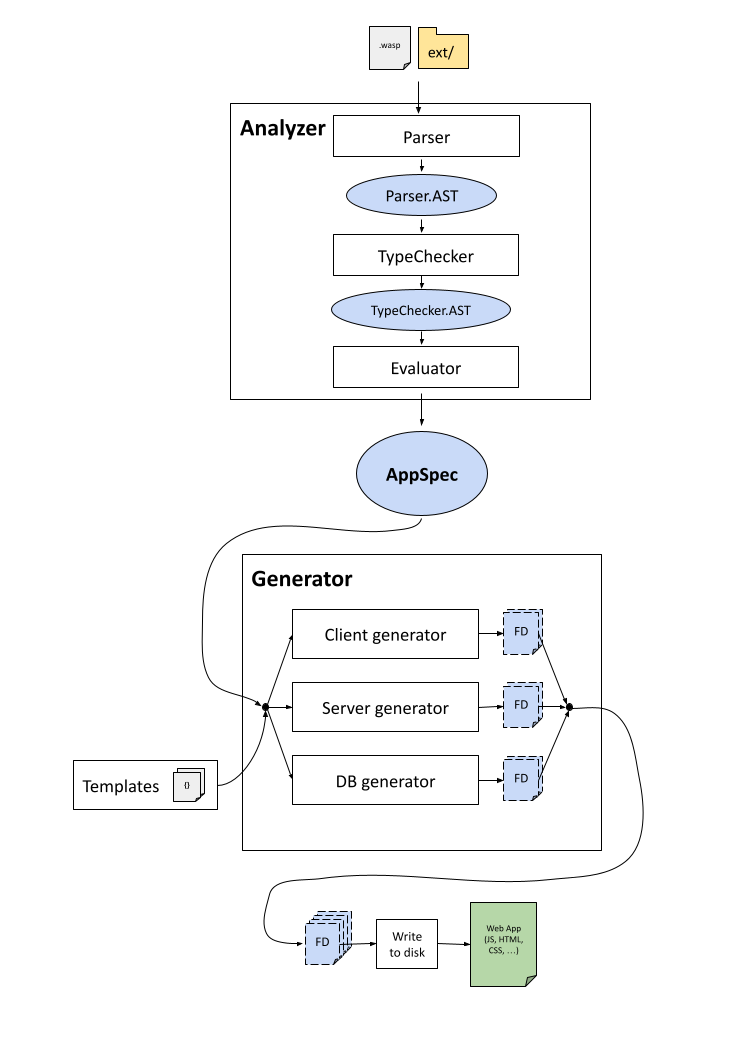
Wasp compiler takes .wasp files + everything in the ext/ dir (JS, HTML, ...) and generates a web app that consists of client, server and database.
Wasp compiler code is split into 2 basic layers: Analyzer (frontend) and Generator (backend).
Wasp file(s) are analyzed by Analyzer, where they are first parsed, then typechecked, and then evaluated into a central IR (Intermediate Representation), which is AppSpec (src/Wasp/AppSpec.hs).
Check src/Wasp/Analyzer.hs for more details.
AppSpec is passed to the Generator, which based on it decides how to generate a web app.
Output of Generator is a list of FileDrafts, where each FileDraft explains how to create a file on the disk.
Therefore, Generator doesn't generate anything itself, instead it provides instructions (FileDrafts) on how to generate the web app.
FileDrafts are using mustache templates a lot (they can be found in data/Generator/templates).
Generator is split into three generators, for the three main parts of the web app: WebAppGenerator, ServerGenerator and DbGenerator.
After Generator provides us with FileDrafts, web app is generated by writing the FileDrafts to the disk.
Generated web app consists of client, server and database.
Client is written with React and react-query. Server is written in NodeJS and uses ExpressJs. Database is abstracted via Prisma.
We can run Wasp project with wasp start.
This will first compile the app, generate JS code in the .wasp/out/ dir, and then run npm start for the client, npm start for the server, and also run the database.
On any changes you do to the source code of Wasp, Wasp project gets recompiled, and then changes in the generated code are picked up by the npm start of the client/server, therefore updating the web app.
Important directories (in waspc/)
- src/ -> main source code, library
- cli/ -> rest of the source code, cli, uses library
- test/ -> tests
- data/Generator/templates/ -> mustache templates for the generated client/server.
- examples/ -> example apps
Building / development (detailed)
Some useful stack commands:
stack buildto build the project, includingwaspbinary which is both CLI and compiler in one.stack exec wasp-cli <arguments>to run thewaspbinary that you have built.stack testto build the whole project + tests and then also run tests.stack build --file-watch-> live watch, reruns every time a file changes. But we prefer usingghcid, it is faster.stack build --pedantic-> sets -Wall and -Werror ghc options.stack build --profilestack build --tracestack install-> builds the project and places the binary so it is in PATH (and you can call it directly withwasp).stack ghci-> opens ghci in the context of the project, allowing you to load and run local modules.stack clear-> clear all generated files/artifacts.
For live compilation and error checking of your code we recommend using ghcid.
You can install it globally with stack install ghcid and then just type ghcid --command=stack ghci when in the project -> it will watch for any file changes and report errors.
Run script
For more convenient running of common build/dev commands, we created run script.
It mostly runs stack commands described above, reducing the number of characters you have to type to run certain commands.
The idea is that you normally use this for development, and you use stack directly when you need more control.
It is up to you, using stack directly is also perfectly fine and sometimes easier.
You can run ./run help to learn how to use it.
Examples:
./run ghcid-testwill run ghcid that watches tests, while passing correct arguments to ghcid../run stanwill run static analysis of the codebase.
Tests
For tests we are using Tasty testing framework. Tasty let's us combine different types of tests into a single test suite.
In Tasty, there is a main test file that is run when test suite is run. In that file we need to manually compose test tree out of tests that we wrote. We organize tests in test groups, which are then recursively grouped resulting in a test tree. Cool thing is that we can organize tests this way however we want and also mix different type of tests (hspec, quickcheck, and whatever else we want).
Tests are normally split in files of course, so we need to import those all the way up to the main test file, however we organize our test groups/trees.
In order to avoid need for manual organization and importing of test files described above, we are using tasty-discover which does this for us. It automatically detects files containing tests and organizes them for us into a test tree (and also takes care of importing). This means we only need to create a file, write tests in it and that is it. Test functions however do need to be prefixed with special prefix to indicate which type of test are they: spec_ for Hspec, prop_ for QuickCheck and similar. Check docs for more details. We can however still organize tests manually if we want in Tasty test trees, and then we just prefix them with test_ and tasty-discover will pick them up from there.
Additionally, currently we limited tasty-discover to auto-detect only files ending with Test.hs (*Test.hs glob). We might remove that requirement in the future if it proves to have no benefit.
To summarize: If you are writing new tests, just put them in a file that ends with Test.hs in test/ dir and that is it.
For unit testing, we use Hspec.
For property testing, we use Quickcheck.
We additionally use doctest for testing code examples in documentation.
All tests go into test/ directory.
This is convention for Haskell, opposite to mixing them with source code as in Javascript for example.
Not only that, but Haskell build tools don't have a good support for mixing them with source files, so even if we wanted to do that it is just not worth the hassle.
Tests are run with stack test.
You can do stack test --coverage to see the coverage.
To run individual test, you can do stack test --test-arguments "-p \"Some test description to match\"".
We don't yet have any integration (e2e) tests, but we plan to add them at some point.
For now, best way is to manually run a Wasp app with wasp start and try stuff out.
Code analysis
To run the code analysis, run:
./run code-check
This will check if code is correctly formatted, if it satisfies linter, and if it passes static analysis.
These same checks are required to pass the CI, so make sure this is passing before making a PR.
Formatting
For formatting Haskell code we use Ormolu.
Normally we set it up in our editors to run on file save.
You can also run it manually with
./run ormolu:check
to see if there is any formatting that needs to be fixed, or with
./run ormolu:format
to have Ormolu actually format (in-place) all files that need formatting.
Linting
We use hlint for linting our Haskell code.
You can use
./run hlint`
to run the hlint on Wasp codebase.
Static Analysis
We use stan to statically analyze our codebase.
The easiest way to run it is to use
./run stan
This will build the codebase, run stan on it (while installing it first, if needed, with the correct version of GHC) and then write results to the CLI and also generate report in the stan.html.
Commit message conventions
We use Conventional Commits convention when creating commits.
Deployment / CI
We use Github Actions for CI.
CI runs for any commits on main branch, for pull requests, and for any commits tagged with tag that starts with v.
During CI, we build and test Wasp code on Linux, MacOS and Windows.
If commit is tagged with tag starting with v, github draft release is created from it containing binary packages.
If you put [skip ci] in commit message, that commit will be ignored by Github Actions.
We also wrote a new-release script which you can use to help you with creating new release: you need to provide it with new version (./new-release 0.3.0) and it will update the version in package.yaml, commit it, push it, and will also create appropriate tag and push it, therefore triggering CI to create new release on Github.
NOTE: If building of your commit is suddenly taking much longer time, it might be connected with cache on Github Actions. If it happens just once every so it is probably nothing to worry about. If it happens consistently, we should look into it.
Documentation
External documentation, for users of Wasp, is hosted in separate repo.
Make sure to update it when changes modify how Wasp works.
Haskell
We are documenting best practices related to Haskell in our Haskell Handbook.