3.9 KiB
nextjs-8-serverless
Boilerplate to get started with Next.js 8 Serverless Mode, Hasura GraphQL engine as CMS and postgres as database.
Tutorial
-
Deploy Postgres and GraphQL Engine on Heroku:
Please checkout our docs for other deployment methods
-
Get the Heroku app URL (say
my-app.herokuapp.com) -
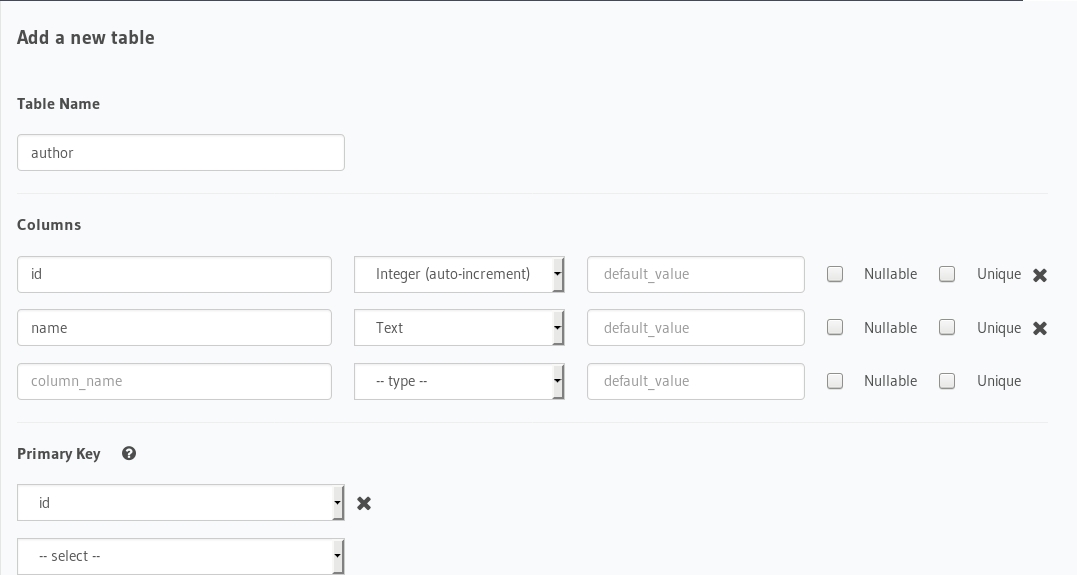
Create
authortable:Open Hasura console: visit https://my-app.herokuapp.com on a browser
Navigate toDatasection in the top nav bar and create a table as follows: -
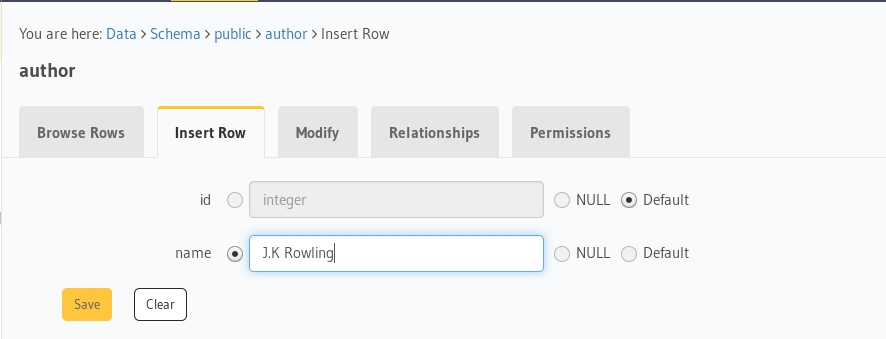
Insert sample data into
authortable:Verify if the row is inserted successfully
-
Clone this repo:
git clone https://github.com/hasura/graphql-engine cd graphql-engine/community/sample-apps/nextjs-8-serverless -
Install npm modules:
npm install -
Open
lib/init-apollo.jsand configure Hasura's GraphQL Endpoint as follows:function create (initialState) { return new ApolloClient({ connectToDevTools: process.browser, ssrMode: !process.browser, // Disables forceFetch on the server (so queries are only run once) link: new HttpLink({ uri: 'https://myapp.herokuapp.com/v1alpha1/graphql', // Server URL (must be absolute) credentials: 'same-origin' // Additional fetch() options like `credentials` or `headers` }), cache: new InMemoryCache().restore(initialState || {}) }) }
Replace the uri with your own Hasura GraphQL endpoint.
In this example, we integrate Apollo with Next by wrapping our pages/_app.js inside a higher-order component HOC. Using the HOC pattern we're able to pass down a central store of query result data created by Apollo into our React component hierarchy defined inside each page of our Next application.
On initial page load, while on the server and inside getInitialProps, we invoke the Apollo method, getDataFromTree. This method returns a promise; at the point in which the promise resolves, our Apollo Client store is completely initialized.
-
We have defined the graphql query in
components/AuthorList.js.query author($skip: Int!) { author(offset: $skip, limit: 5) { id name } author_aggregate { aggregate { count } } } -
Run the app:
npm run dev -
Test the app Visit http://localhost:3000 to view the app
Serverless Mode
With Next.js 8, each page in the pages directory becomes a serverless lambda. To enable serverless mode, we add the serverless build target in next.config.js.
module.exports = {
  target: "serverless",
};
That's it! Now build the serverless app by running the following command:
npm run build
In the .next folder, you will see a serverless folder generated after the build. Inside that there is a pages folder, which will have outputs of lambda per page.
pages/index.js => .next/serverless/pages/index.js
pages/about.js => .next/serverless/pages/about.js
Deploy to now.sh
Deploy it to the cloud with now (download):
npm install -g now
now
Note: Older versions of now-cli doesn't support serverless mode.
Once the deployment is successful, you will be able to navigate to pages / and /about, with each one internally being a lambda function which now manages.


