12 KiB
mdx-deck
MDX-based presentation decks (Beta)
npm i -D mdx-deck
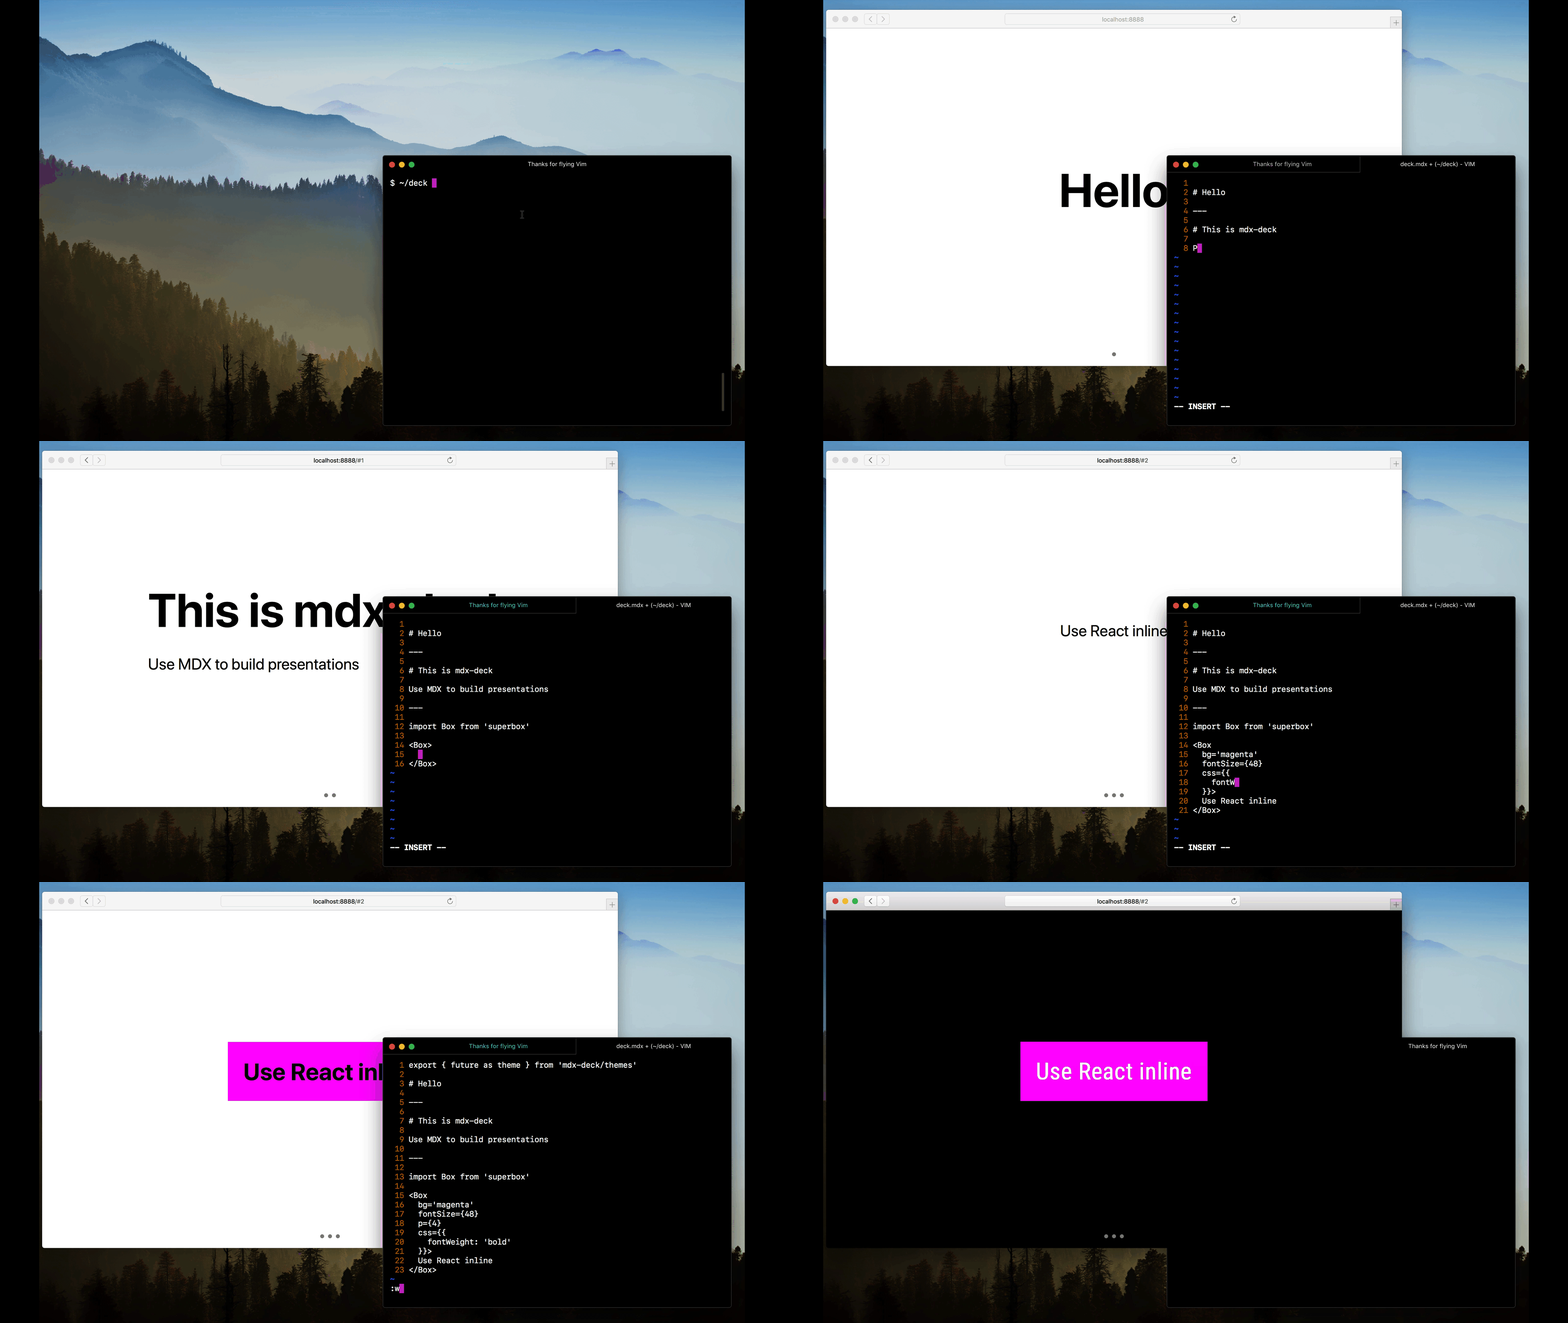
- 📝 Write presentations in markdown
- ⚛️ Import and use React components
- 💅 Customizable themes and components
- 0️⃣ Zero-config CLI
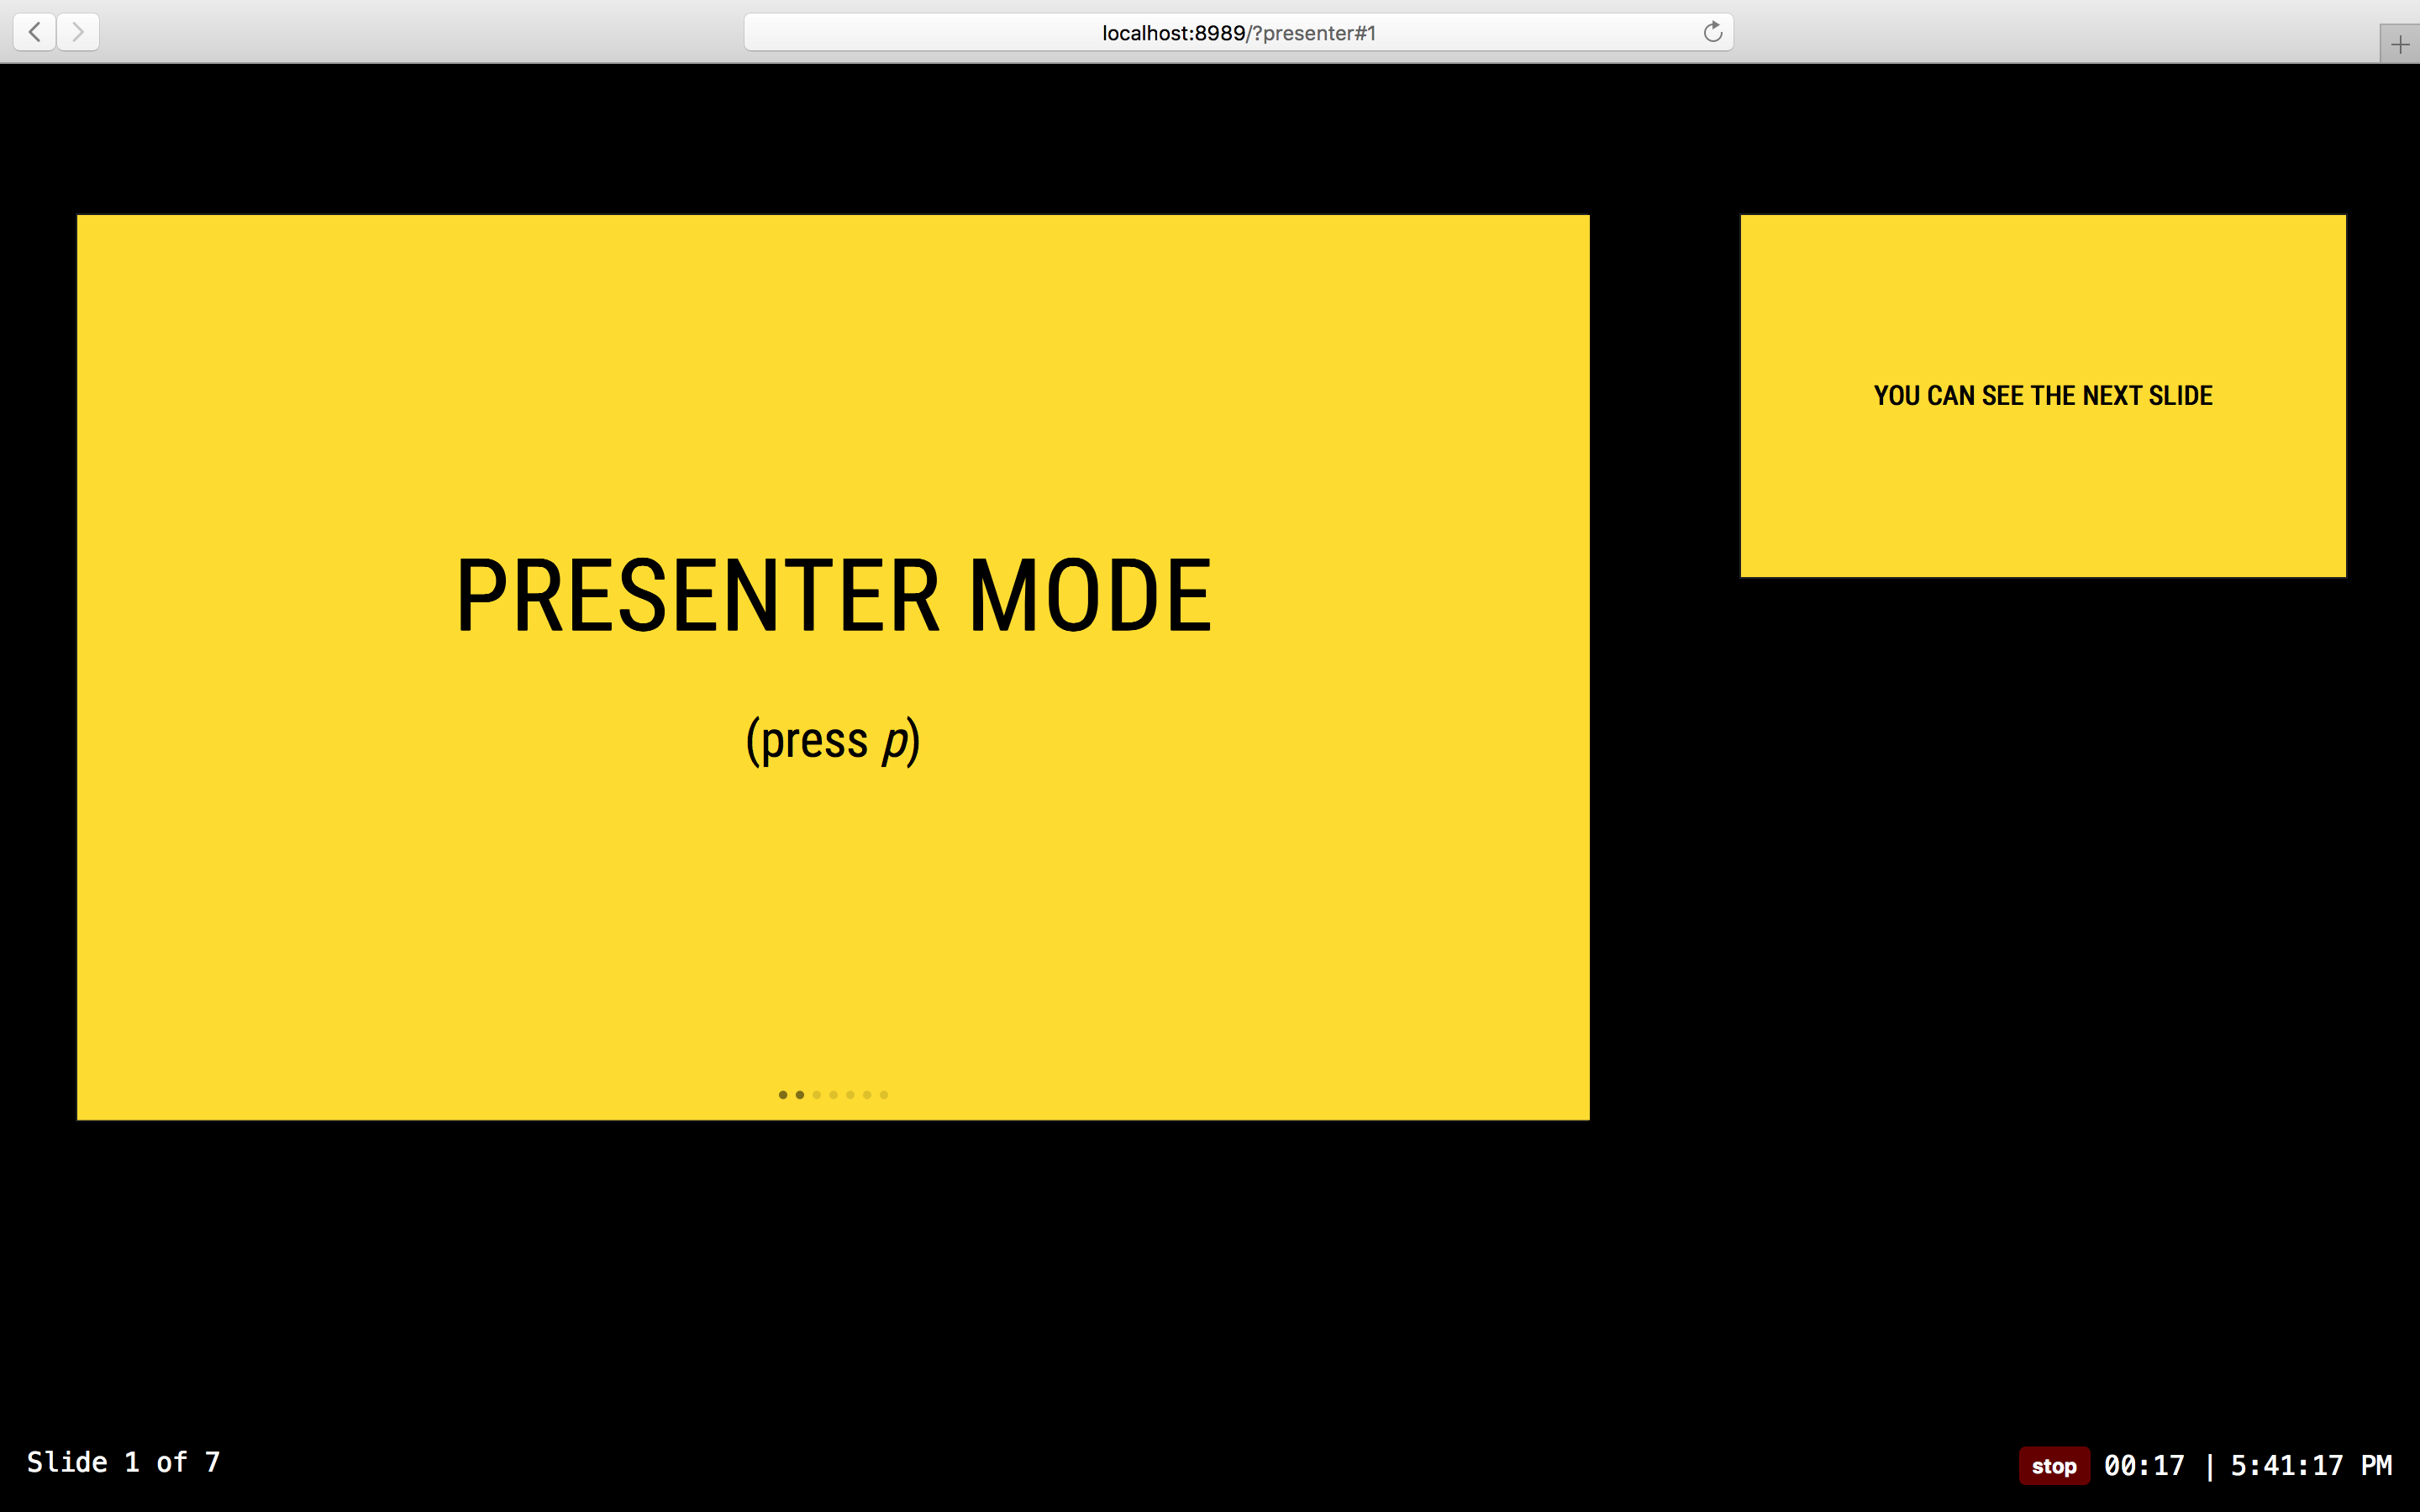
- 💁♀️ Presenter mode
- 📓 Speaker notes
Getting Started
Create an MDX file and separate each slide with ---.
# This is the title of my deck
---
# About Me
---
```jsx
<CodeSnippet />
```
---
import Demo from './components/Demo'

<Demo />
---
# The end
Add a run script to your package.json with the mdx-deck CLI
pointing to the .mdx file to start the dev server:
"scripts": {
  "start": "mdx-deck deck.mdx"
}
Start the dev server:
npm start
Video Tutorial
For a video introduction, see this egghead tutorial by @andrewdelprete.
Usage
MDX can use Markdown syntax and render React components with JSX.
Imports
To import components, use ES import syntax separated with empty lines from any markdown or JSX syntax.
import { Box } from 'grid-styled'

<Box color='tomato'>
  Hello
</Box>
Theming
mdx-deck uses styled-components for styling.
Built-in Themes
mdx-deck includes several built-in themes to change the look and feel of the presentation.
Export theme from your MDX file to enable a theme.
export { dark as theme } from 'mdx-deck/themes'

# Dark Theme
For a list of available themes see the Themes Docs.
Custom Themes
A custom theme can be provided by exporting theme from the MDX file.
export { default as theme } from './theme'

# Hello
The theme should be an object based on styled-system's theme schema.
// example theme.js
export default {
  font: 'Georgia',
  monospace: 'Menlo, monospace',
  fontSizes: [
    '0.75em', '1em', '1.5em', '2em', '3em'
  ],
  colors: {
    text: '#000',
    background: 'transparent',
    link: '#07c',
    heading: '#000',
    quote: '#000',
    pre: '#f0f',
    preBackground: '#333',
    code: '#f0f',
    codeBackground: 'transparent',
  },
  css: {
    // apply any styles to the root element
  },
  // custom CSS can be provided to any of the default components:
  heading: {
    fontWeight: 400
  },
  link: {
    textDecoration: 'none',
    '&:hover': {
      textDecoration: 'underline',
    }
  }
}
The following keys are available for theming:
font: base font familymonospace: font family for<pre>and<code>fontSizes: array of font sizes from smallest to largestcolors: object of colors used for MDX componentstext: root foreground colorbackground: root background colorlinkheadingblockquoteprepreBackgroundcodecodeBackground
css: root CSS objectheading: CSS for all headingsh1: CSS for<h1>h2: CSS for<h2>h3: CSS for<h3>paragraph: CSS for<p>link: CSS for<a>ul: CSS for<ul>ol: CSS for<ol>li: CSS for<li>img: CSS for<img>table: CSS for<table>
Syntax Highlighting
By default fenced code blocks do not include any syntax highlighting.
Syntax highlighting in fenced code blocks can be enabled by providing a prism style object in a theme.
The syntax highlighting is built with react-syntax-highlighter and PrismJS.
Create a theme.js file and export it via the MDX file.
export { default as theme } from './theme'
//...
// example theme.js
import { future } from 'mdx-deck/themes'
import okaidia from 'react-syntax-highlighter/styles/prism/okaidia'

export default {
  ...future,
  prism: {
    style: okaidia
  }
}
By default, only JavaScript and JSX are enabled for syntax highlighting to keep bundle sizes to a minimum.
To enable other languages, add a languages object to the prism object in the theme.
// example theme.js
import { future } from 'mdx-deck/themes'
import okaidia from 'react-syntax-highlighter/styles/prism/okaidia'
import prismRuby from 'react-syntax-highlighter/languages/prism/ruby'

export default {
  ...future,
  prism: {
    style: okaidia,
    languages: {
      ruby: prismRuby
    }
  }
}
To see available syntax styles and languages, see:
Custom Components
mdx-deck includes default components for MDX, but to provide custom components to the MDXProvider, add components to the theme settings.
import { theme } from 'mdx-deck/themes'
import Heading from './Heading'

const theme = {
  ...theme,
  font: 'Georgia, serif',
  components: {
    h1: Heading
  }
}

# Custom Components
Components
mdx-deck includes some built-in components to help with creating presentations.
Image
Use the <Image /> component to render a fullscreen image (using the CSS background-image property).
import { Image } from 'mdx-deck'

<Image src='kitten.png' />
Appear
Use the <Appear /> component to make its children appear one at a time within a single slide.
Use the up and down arrow keys to step through each element.
import { Appear } from 'mdx-deck'

<ul>
  <Appear>
    <li>One</li>
    <li>Two</li>
    <li>Three</li>
  </Appear>
</ul>
Layouts
Each slide can include a custom layout around its content. This can be used as a substitute for slide templates found in other presentation apps and libraries.
// example Layout.js
import React from 'react'

export default ({ children }) =>
  <div
    style={{
      width: '100vw',
      height: '100vw',
      backgroundColor: 'tomato'
    }}>
    {children}
  </div>
import Layout from './Layout'

# No Layout

---
export default Layout

# Custom Layout
The layout component will wrap the MDX elements within that slide, which means you can use a nested ThemeProvider or target elements with CSS-in-JS.
Built-in Layouts
mdx-deck includes a few built-in layouts for common slide variations.
Invert
Inverts the foreground and background colors from the theme.
import { Invert } from 'mdx-deck/layouts'

# Normal

---

export default Invert

# Inverted
Split
Creates a horizontal layout with the first child on the left and all other children on the right.
import { Split } from 'mdx-deck/layouts'
export default Split

## Meow
SplitRight
Same as the Split component, but renders the first child on the right.
import { SplitRight } from 'mdx-deck/layouts'
export default SplitRight

## Meow
Custom Provider
A custom Provider component can be added to theme settings to wrap the entire application. This is useful for adding custom context providers in React.
import { theme } from 'mdx-deck/themes'
import Provider from './Provider'

const theme = {
  ...theme,
  font: 'Georgia, serif',
  Provider
}
A custom Provider component will receive the application's state as props, which can be used to show custom page numbers or add other elements to the UI.
Props
index: (number) the current slide indexlength: (number) the length of the slides arraymode: (string) the current mode (one of'NORMAL'or'PRESENTER')notes: (object) custom speaker notes for all slides
Presenter Mode
mdx-deck includes a built-in presenter mode, with a preview of the next slide and a timer.
To use presenter mode:
- Open two windows in the same browser, with the same URL on two different screens. (this should work in both development and exported presentations)
- In your window press the
Option + P(Alt + P) key to enter presenter mode. - Display the other window on the screen for the audience to see.
- Control the presentation from your window by using the left and right arrow keys; the other window should stay in sync
Speaker Notes
Notes that only show in presenter mode can be added to any slide. Speaker notes can be added in one of the following two ways:
Markdown: Use the notes language attribute in a fenced code block to add speaker notes.
# Slide Content

```notes
These are only visible in presenter mode
```
Notes Component: Use the Notes component to create more complex speaker notes.
import { Notes } from 'mdx-deck'

# Slide Content

<Notes>
  Only visible in presenter mode
</Notes>
Keyboard Shortcuts
| Key | Description |
|---|---|
| Left Arrow | Go to previous slide |
| Right Arrow | Go to next slide |
| Space | Go to next slide |
| Option + P | Toggle Presenter Mode |
| Up Arrow | Hide current step in Appear component |
| Down Arrow | Show next step in Appear component |
Exporting
Add a build script to your package.json to export a presentation as HTML with a JS bundle.
"scripts": {
  "build": "mdx-deck build deck.mdx"
}
PDF Export
Presentations can be exported as PDF using the CLI. This works well as a backup option for any unforeseen technical difficulties.
"script": {
  "pdf": "mdx-deck pdf deck.mdx"
}
CLI Options
-p --port     Dev server port
--no-open     Prevent from opening in default browser
-d --out-dir  Output directory for exporting
--title       Title for the HTML document
React API
mdx-deck components can also be used in any React application, such as create-react-app or next.js.
Webpack Loader
mdx-deck uses a custom webpack loader to split MDX files into an array of slides. Use this loader to import mdx files in a webpack application.
// example webpack.config.js
module.exports = {
  module: {
    rules: [
      {
        test: /\.mdx$/,
        ignore: /node_modules/,
        use: [
          'babel-loader',
          'mdx-deck/loader'
        ]
      }
    ]
  }
}
SlideDeck Component
import React from 'react'
import { SlideDeck } from 'mdx-deck'
import slides from './deck.mdx'
import theme from './theme'
import components from './components'

export default () =>
  <SlideDeck
    slides={slides}
    theme={theme}
    components={components}
    width='100vw'
    height='100vh'
  />
View the source for other components available for use.


