Fixes #385 . Note, we will need to update `TUTORIAL.md` since this changes what world 0 looks like, but I wanted to get some feedback before launching into updating that.
18 KiB
Swarm: The Tutorial
This is a brief tutorial that should hopefully get you up and running with Swarm. Swarm is changing rapidly, so this tutorial may not be entirely up-to-date in some unimportant ways (e.g. the UI may look slightly different), but the intention is to keep it updated as the game evolves. If you find any mistakes, or things that are confusing, or ways that the tutorial no longer corresponds to the game, please file a bug report or open a pull request! Eventually, this tutorial file should be replaced by an in-game tutorial.
It is recommended that you use a relatively large terminal window
(e.g. 132 x 43 at a minimum, ideally larger). On the other hand,
the larger the window, the longer it takes the vty library to draw a
frame. You can play with the sizing while the game is running---it
will automatically adjust to the size of the terminal.
The backstory
In a shockingly original turn of events, you have crash landed on an
alien planet! Your only hope is to Scratch that, you have no hope
at the moment, but since you're here, you might as well explore a bit.
Your sensors indicate that the atmosphere is highly toxic, so you'll
have to stay inside your robotic base, with its built-in life support
system. However, you are stocked with all the materials you need to
build a lot of robots to explore for you! To start, you only have the
materials to make some very basic devices which give your robots
abilities like moving, turning, grabbing things, and interpreting
very simple imperative programs. As you use your robots to gather
resources, you will be able to construct better devices which in turn
allow you to construct robots with upgraded abilities and programming
language features, which in turn allow you to program more
sophisticated robots which in turn will OK I think you get the idea.
Getting started
To skip past the main menu for now and ensure you're playing on the same world described in this tutorial, start Swarm with a command line like
stack run -- -s 0
This tells Swarm to use 0 as the seed for the random number generator (and automatically load a new game rather than showing the main menu).
You should then be greeted by a screen that looks something like this:
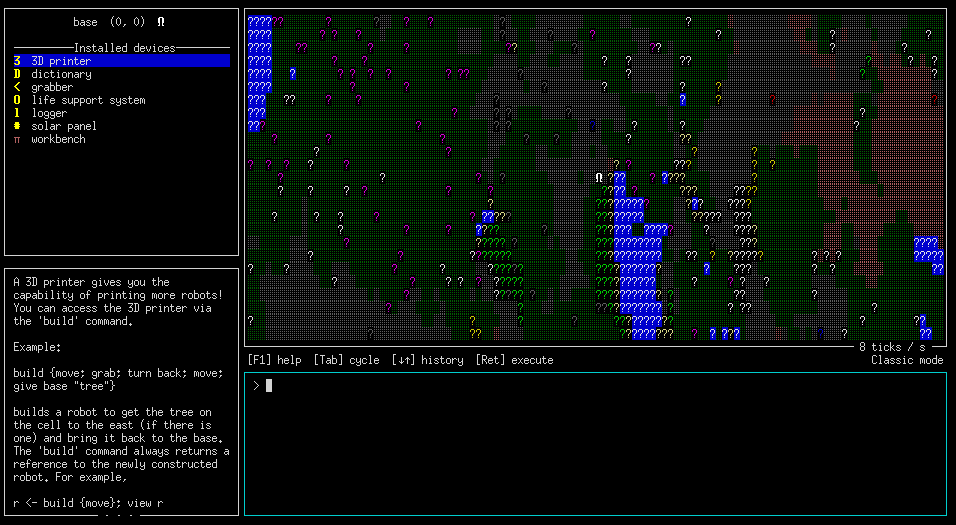
The little white Ω in the middle represents your base. You will
need to explore to find out what all the ? are.
Start by using the Tab key to cycle through the four panels (the REPL, the info panel, the inventory panel, and the world panel), and read about the various devices installed on your base.
There is a lot to take in at first so feel free to just skim; this tutorial will cover the use of your devices in more detail.
Building your first robot
Pretty much the only thing you can do at this point is build robots. Let's build one! Tab back to the REPL (or hit the Meta+R shortcut) and type
build {move}
then hit Enter. You should see a robot appear and travel to the north one step before stopping. It should look something like this:
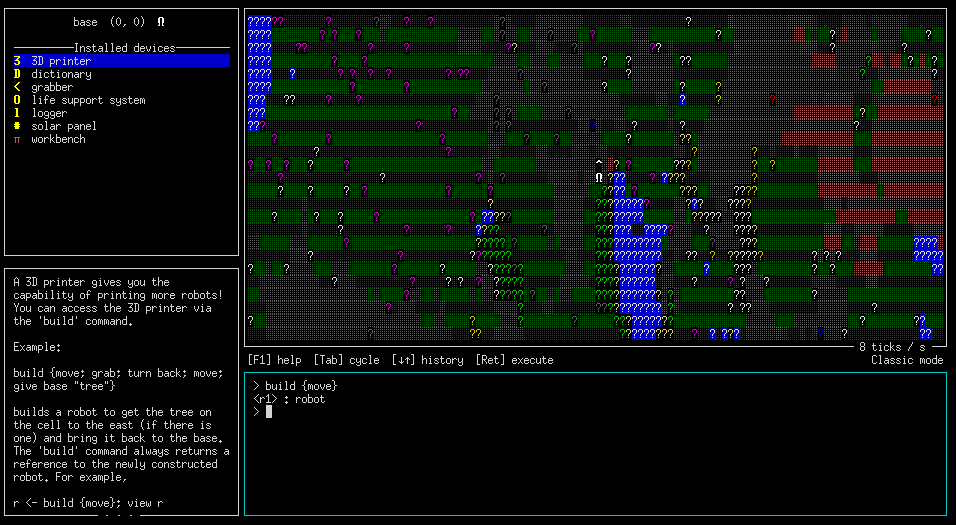
You can also see that on the next line after your input, the REPL printed out something like
<r1> : robot
which is the result of your command, along with its type. The build
command always returns a reference to the robot that it built. Note
that <r1> is not special syntax, just an opaque name for the robot
with ID 1.
You can see that a semicolon is used to chain together commands, that
is, if c1 and c2 are both commands, then c1; c2 is the command
which executes first c1 and then c2. The curly braces around the
second argument to build are required; curly braces create an
expression whose evaluation is delayed until later. In this case,
the build command requires a delayed expression to ensure that the
program will be evaluated by the newly built robot and not
immediately when the build command itself is being evaluated.
Types
Ultimately, the build command is not special syntax, but just a
function that takes an argument representing a delayed command. We
can actually see the type of build (or anything else) by
typing it at the prompt, without hitting Enter. Any time the
expression currently typed at the prompt parses and type checks, the
REPL will show you the type of the expression in the upper right, like
this:
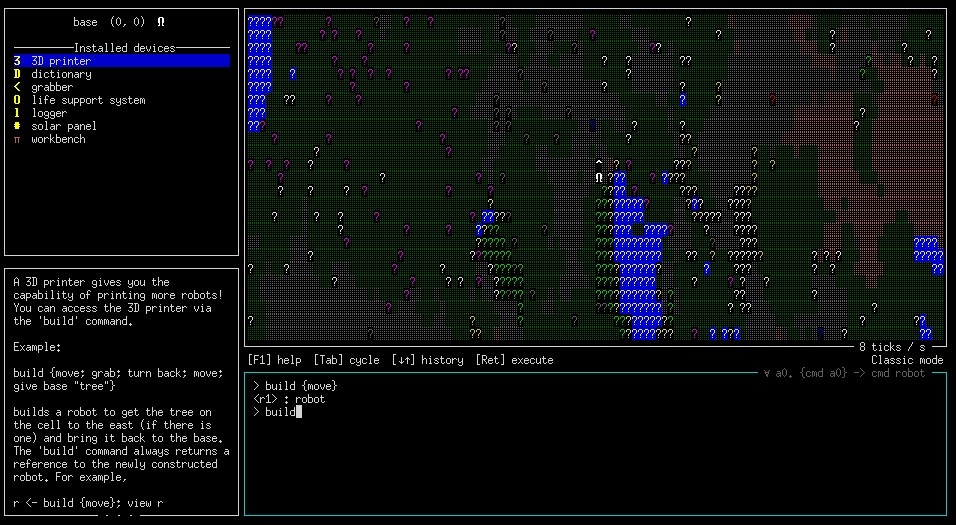
In this case, we can see that the type of build is
∀ a0. {cmd a0} -> cmd robot
which says that build takes one argument---a
delayed command that returns a value of any type---and results in a command
which returns a robot. Every command returns a value, though some
might return a value of the unit type, written (). For example, if
you type move at the prompt, you will see that its type is cmd (),
since move does not return any interesting result after executing.
Let's try intentionally entering something that does not typecheck. Type the following at the prompt:
"hi" + 2
Clearly this is nonsense, and you can see that your input is shown in
red, and there is no type displayed in the upper-right corner of the
REPL panel, telling us that there is some kind of error (either a
parse error or a type error). If you want to see what the error is,
just hit Enter: a dialog box will pop up with a (somewhat) more
informative error message.
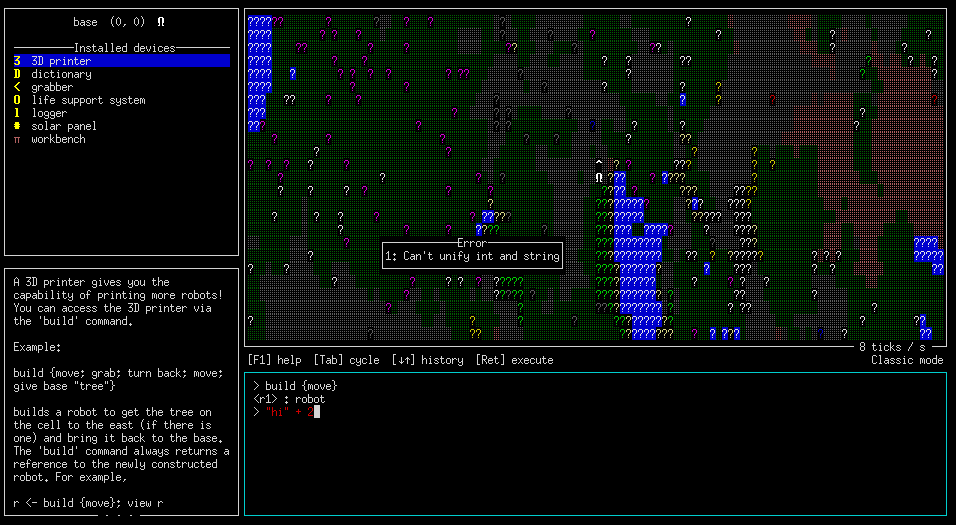
To get rid of the error dialog, just hit the Esc key.
Something you can't do yet
Try entering the following at the REPL:
build {make "curry"}
The info panel should automatically switch to showing your logger
device, with an error message at the bottom saying something like
build: this would require installing devices you don't have:
  workbench
This is telling you that in order to build a robot which has the right
capabilities to run this program, you would need to
install a workbench device on the robot, but you don't have a
workbench in your inventory. (You do have a workbench device
installed in your base robot, but you can't rip it out and put it in
another robot. You'll have to find a way to make more.)
Creating definitions
We can already tell it's going to be tedious getting the robots
anywhere with move;move;move;move;.... Since your base has
a dictionary installed, let's create some definitions to make
our life a bit easier. To start, type the following:
def m : cmd () = move end
The : cmd () annotation on m is optional; in this case the game
can easily figure out the type of m if we just write def m = move end
(though there are some situations where a type signature may be
required). The end is required, and is needed to disambiguate where
the end of the definition is.
Now try this:
def m2 = m; m end; def m4 = m2; m2 end; def m8 = m4; m4 end
The semicolon between def commands is optional, so you can put
def commands in a file and not write a semicolon after every end.
Great, now we have commands that will execute move multiple times.
Now let's use them:
build { turn left; m4; m }
This should build a robot that moves toward the green mass to the west.
The base is still turned north, so the robot needs to turn left
to be oriented to the west. Once you have a compass to install on
the robot, you will be able to turn west directly.
You might wonder at this point if it is possible to create a function
that takes a number as input and moves that many steps forward, like
go : int -> cmd (). Well, it most certainly is possible, but right
now your robots would not be capable of executing it. You'll have to
figure out how to upgrade them!
Getting the result of a command
The result of a command can be assigned to a variable using a left arrow, like so:
var <- command; ... more commands that can refer to var ...
Yes, it's like Haskell's do-notation; and yes, cmd is a
monad, similar to the IO in Haskell. But if that doesn't mean
anything to you, don't worry about it!
Let's build another robot, but this time we will capture it in a
variable using the above syntax. Then we can use the view command
to focus on it instead of the base:
r <- build { turn left; m4; m }; view r
Note that base executes the view r command as soon as it
finishes executing the build command, which is about the same time
as the newly built robot starts executing its program. So we get to
watch the new robot as it goes about its business. Afterwards, the
view should look something like this:
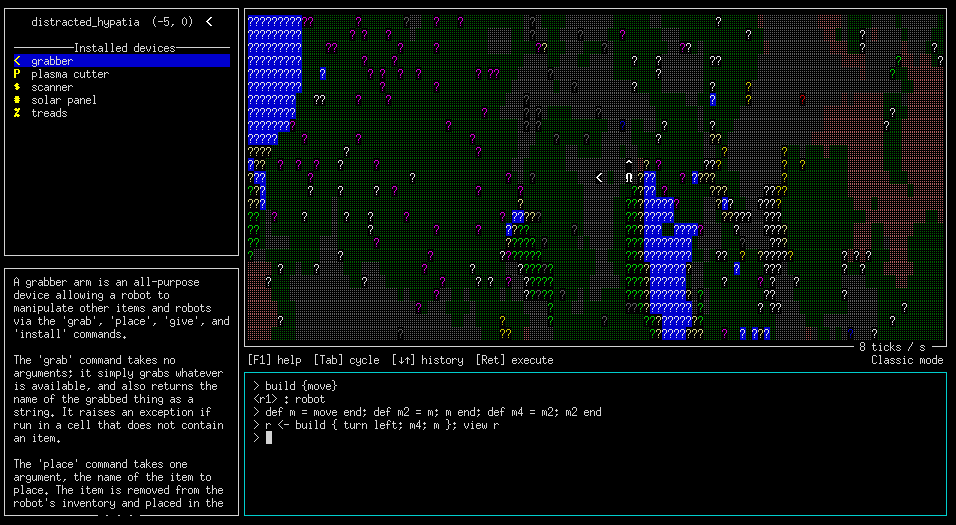
The view is now centered on the other robot instead of on our base,
and the top-left panel shows its inventory and installed devices
instead of base's. (However, commands entered at the REPL will
still be executed by base.) The name of your robot will likely be
different than sleepy_austin; otherwise unnamed robots are given
randomly chosen names. To return to viewing base and its inventory,
you can type view base at the prompt, or focus the world panel
(either using Tab or Meta+W) and hit
C. If you ever want to view the other robot again, you can
type view r: the variable r will be in scope at the REPL prompt
from now on.
You can set the display name of a robot using the setname command.
The randomly generated names are amusing, but being able to set the
display name explicitly can help with debugging.
Exploring
So what is all this stuff everywhere? Let's find out! When you
build a robot, by default it starts out with a scanner device,
which you may have noticed in the recently viewed robot's inventory.
You can scan items in the world to learn about them, and later
upload what you have learned to the base.
Let's build a robot to learn about those green ? things to the south:
build {turn back; m; scan forward; upload base}
The turn command we used to turn the robot takes a direction as an
argument, which can be either a relative direction (forward, back,
left, right, or down) or an absolute direction (north, south,
east, or west) for which you need a compass.
Instead of upload base we could have also written upload parent;
every robot has a special variable parent which refers to the robot
that built it.
Notice that the robot did not actually need to walk on top of a ? to
learn about it, since it could scan forward to scan the cell one unit
in its direction (you can also scan down to scan an item directly beneath the
robot). Also, it was able to upload at a distance of one cell away from
the base.
After this robot finishes, you should have a new entry in your inventory:

Apparently those things are trees! Although you do not actually have any trees yet, you can tab over to your inventory to read about them. In the bottom left corner you will see a description of trees along with some recipes involving trees. There is only one recipe, showing that we can use a tree to construct two branches and a log.
Getting some resources
So those tree things look like they might be useful. Let's get one!
build {turn back; m2; thing <- grab; turn back; m2; give base thing }
You can see that the
grab command returns the name of the thing it grabbed, which is
especially helpful when grabbing something unknown. (In this case we
also could have just written ...; grab; ...; give base "tree".)
You should see a robot head south from your base, grab a tree, and
return to the base. If all works properly, after the newly built
robot executes the give command, the number next to the tree entry
in your inventory should turn from 0 to 1. Note that in this case, we
could have skipped the scan step and simply made a robot to go
grab a tree and bring it to us; we would find out what it is when we
actually got one in our inventory. But scan is still useful for
things that can't be picked up; you can also make a robot that scans
multiple things before uploading its knowledge to the base.
Since your base has a workbench installed, you can use the make
command to make things. Just give it the name of a thing you'd like
to make, and the system will automatically pick a recipe which
produces the thing you requested and for which you have all the
necessary inputs. In this case we can request to make either a
"log" or a "branch"; it doesn't matter which, and we will get the
same result either way.
Note that since the make command takes a string as an argument,
"log" has to go in double quotes (otherwise it would be a variable).
You should now have two branches and a log in your inventory. Take a
look at them and see what recipes they enable!
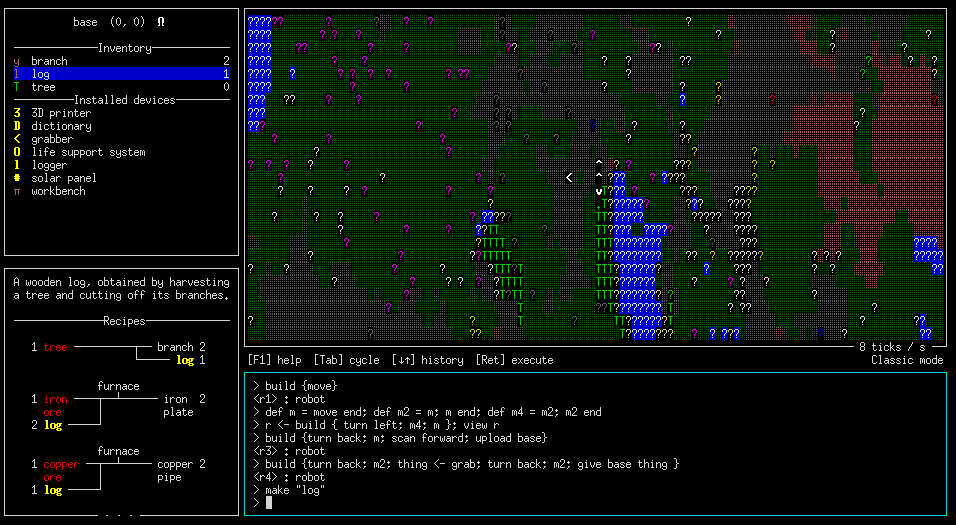
By this time you may also notice that the tree has grown back (whether it has finished growing back depends on how long you took to read the intervening tutorial, and on the random number generator). Some items in the world will regrow after they have been harvested, and some will not.
Debugging and cleaning up
You may have noticed that robots which finish running their programs just sit there forever. Relatedly, various conditions can cause a robot to crash, which would also leave it stranded. Let's see both how to clean up leftover robots, and a simple way to diagnose when something goes wrong.
When a robot program crashes, it prints a message to a log which can
later be used to help diagnose the error---that is, if the robot has
a logger device. Otherwise, the error message is simply lost.
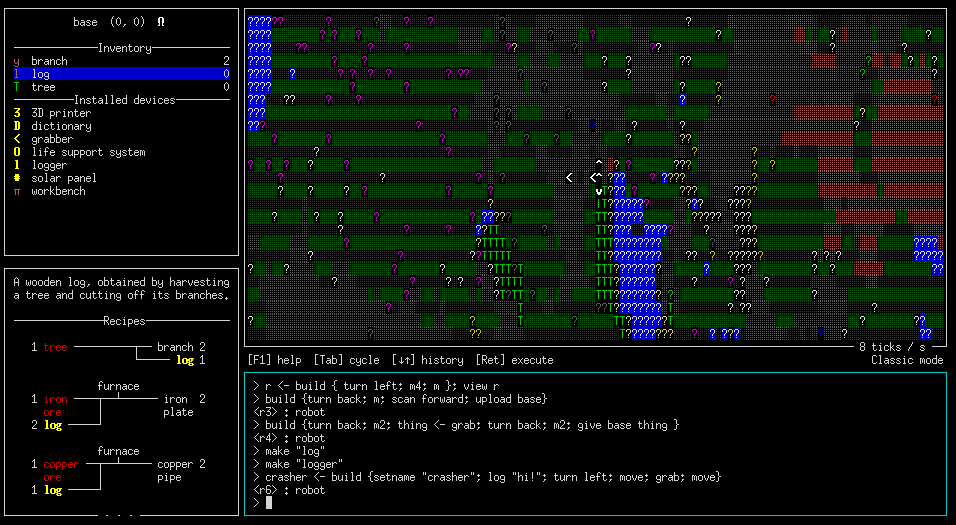
Let's build a robot with a logger device and make it crash on
purpose to see how this works.
First, we have to make a logger device. A logger can be made from
one log, which you should already have in your inventory, so simply
type make "logger" at the REPL.
Now, how do we build a robot with the logger installed? The
easiest way is to have the robot explicitly use the log command; the
build command analyzes the given program and automatically installs
any devices that will be necessary to execute it. (It is also
possible to manually install devices with the install command.) So
let's type the following:
crasher <- build {setname "crasher"; log "hi!"; turn left; move; grab; move}
(The setname "crasher" command is not strictly necessary, but will
help us understand the logs we look at later --- otherwise the log
entries would be indexed by some randomly generated robot name.) The
world should now look something like the below. Notice that the
logger is gone from your inventory---it was automatically installed
on crasher. Notice also that crasher only moved one unit west,
even though we told it to move two steps! What went wrong?
One thing we could do at this point is to view crasher. However,
it will probably become a bit more difficult to use the view command in
future versions of the game, and in any case, what if we didn't have
a reference to the robot that crashed? Fortunately, there is
something else we can do: send out another robot to salvage the
crashed robot.
The salvage command can be executed by any robot with a plasma cutter,
which is one of the devices installed on new robots by default. It
takes no arguments, and simply looks for any idle robot in the same
cell; if it finds one, it disassembles the idle robot, transferring
all its inventory and installed devices into the inventory of the
robot that ran the salvage command. It also copies over the log of
the robot being salvaged, appending it to its own log (if it has
one). If there is no idle robot present, the salvage command simply
does nothing.
So let's salvage the crasher using the code below. We need
to ensure that the salvaging robot itself has a logger, so that it
can copy over the dead robot's log, so we have to first grab another
tree in order to make one. Note the use of
the upload command, which we have seen before. In addition to
uploading knowledge about entities, it turns out that it also uploads
the log from a logger.
build {turn back; m4; thing <- grab; turn back; m4; give base thing}
make "log"; make "logger"
build {setname "salvager"; turn left; move; log "salvaging..."; salvage; turn back; move; upload base}
The world should now look something like this:
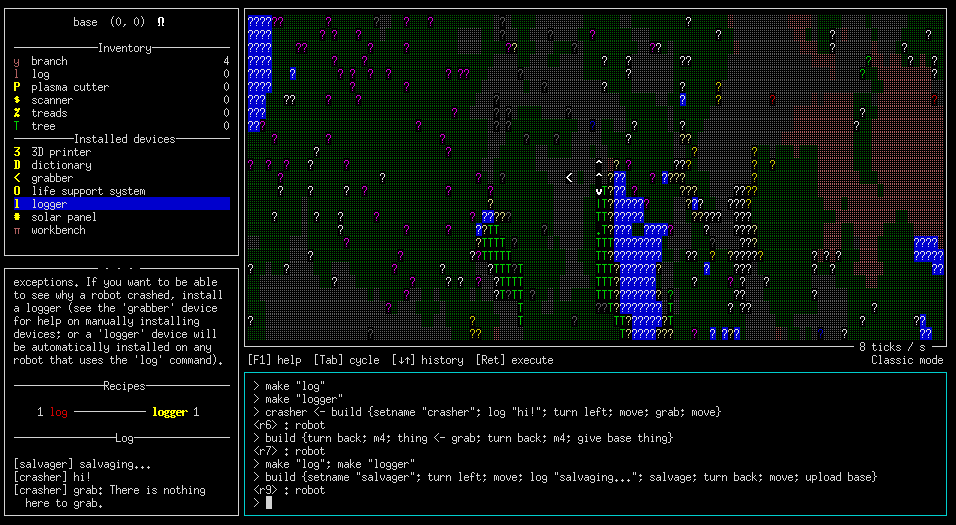
As you can see, the base's log now contains some entries from
crasher! They were copied over to salvager's log when it salvaged
crasher, and then to the base's log when salvager executed the upload
command. We can see the initial hi! entry, and then we can see the
reason that it crashed: it attempted to execute a grab instruction
in a cell with nothing to grab.
Loading definitions from a file
One last thing for now: typing all your definitions at the REPL is
quite tedious, and makes it difficult to go back and edit definitions.
Instead, it is possible to load definitions from a file. Just type
run("filename") and the contents of the file will be executed as if
you typed it at the REPL. For example, rather than typing definitions
at the prompt, you could put a sequence of definitions in a file,
(note that whitespace is ignored, so format it however you like).
Then you can easily modify the definitions or add more, and just run
the file every time you want to reload the definitions. Eventually,
there will be a way to both save and load commands, but this is better
than nothing for now.
There is some rudimentary Language Server-based editor
support
giving syntax and error highlighting for .sw files; at the moment
Emacs is supported along with VSCode.
Now go forth and build your swarm!